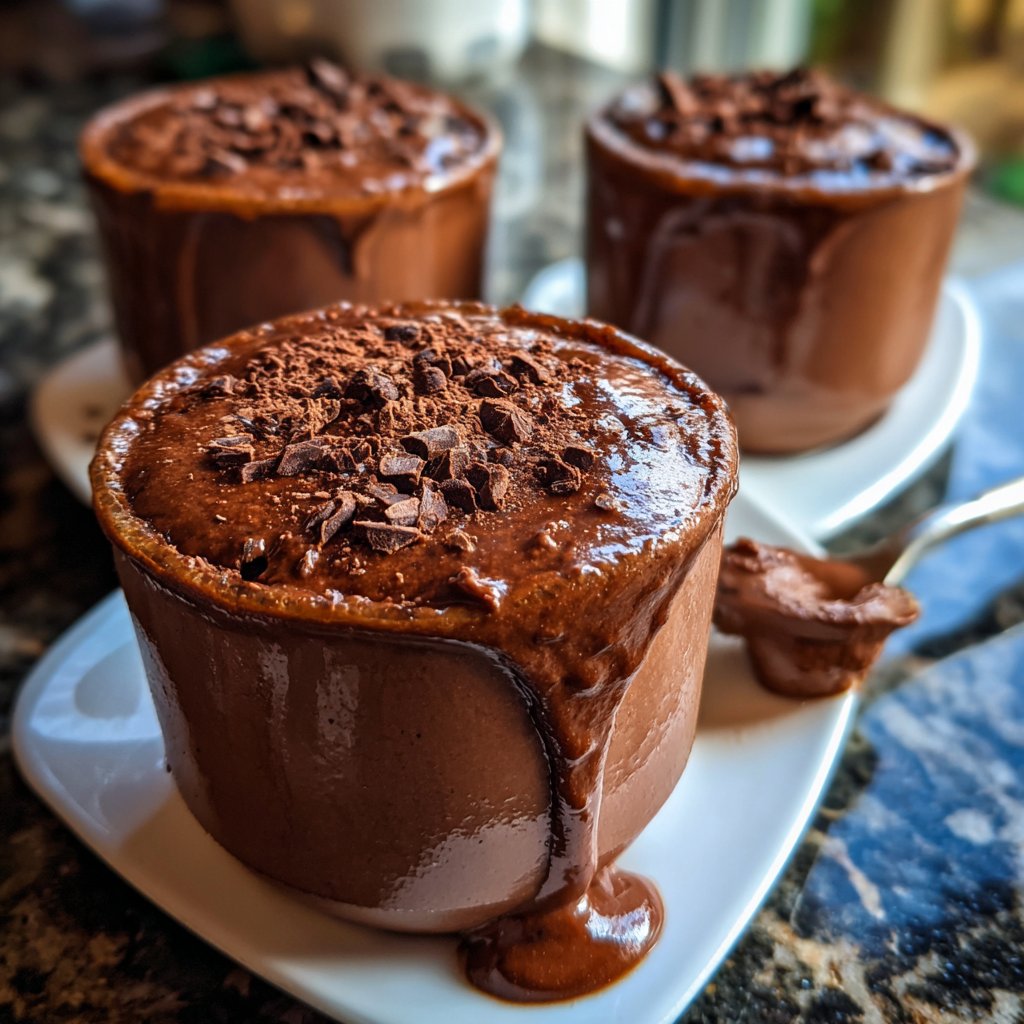
Creamy Chocolate Pudding Cups
Highlighted under: Butter, Sugar & Flour
I absolutely love indulging in desserts that are both rich and comforting, and these Creamy Chocolate Pudding Cups are my perfect treat. With a luscious, velvety texture, they bring together the deep flavors of dark chocolate and a hint of vanilla. Making these cups is surprisingly simple, requiring just a few pantry staples, and the joy of whipping them up always adds sweetness to my day. Whether it’s a cozy night in or a special occasion, these pudding cups never fail to impress.

When I first set out to make these pudding cups, I wanted to create something that highlighted the chocolate while remaining incredibly smooth and creamy. The key was to truly embrace the chocolate's richness without overpowering it with too much sweetness. I found that using high-quality dark chocolate made all the difference, giving each bite a luxurious flavor.
One tip I discovered while experimenting is to let the pudding cool slightly before pouring it into the cups. This enhances the texture as it sets, allowing for a beautifully smooth finish. Trust me, these little cups of joy are worth every minute spent preparing them!
Why You'll Love This Recipe
- Rich chocolate flavor paired with fresh orange zest
- Creamy texture that melts in your mouth
- Perfect for celebrations or as a sweet indulgence
The Role of Chocolate
In this recipe, dark chocolate is where the flavor truly shines. The quality of chocolate you choose will significantly affect the richness of your pudding. I recommend using a chocolate with at least 70% cocoa content, as it offers a deeper, more complex flavor that balances beautifully with the sweetness of the sugar. If you prefer a milder taste, feel free to opt for semi-sweet chocolate instead, but remember that this may result in a less intense chocolate experience.
When incorporating the chopped chocolate, make sure to remove the saucepan from the heat to prevent the chocolate from seizing. Stirring continuously as you add the chocolate helps achieve a smooth, glossy finish. If you happen to notice any small lumps of chocolate after stirring, you can whisk the mixture vigorously or even blend it for a few seconds until completely smooth.
Texture Tips
Achieving that perfect creamy texture is crucial for delicious pudding. The cornstarch plays a vital role in thickening the mixture, and it’s important to cook it long enough for it to activate but avoid overcooking. You’ll know it's ready when the mixture starts to bubble gently and you see a dramatic thickening—this usually takes about 5 minutes once it reaches the heat. Keep the heat at medium to ensure even cooking and prevent scorching.
If you do find that your pudding is not thickening as expected, this may be a result of insufficient heat or not cooking it long enough. Don’t hesitate to return it to the heat and continue stirring. For those who might follow a gluten-free diet, using cornstarch ensures the pudding remains compliant while delivering a luxuriously silky mouthfeel.
Serving and Storage Ideas
To elevate the presentation, consider serving the pudding in elegant glass cups, which allows the beautiful chocolate color to shine. Feel free to garnish with additional toppings, such as a sprinkle of sea salt, chocolate shavings, or fresh berries to add a touch of freshness that contrasts well with the rich chocolate flavor. I also love pairing it with a homemade orange zest sprinkle for a citrusy lift.
These pudding cups can be prepared ahead of time and stored in the refrigerator for up to 3 days. If you want to make them even earlier, you can freeze the pudding; just remember to allow them to thaw in the fridge overnight before serving to preserve the texture. This makes it a fantastic make-ahead dessert for parties or cozy nights in.
Ingredients
Ingredients
- 2 cups whole milk
- 1/2 cup granulated sugar
- 1/3 cup unsweetened cocoa powder
- 3 tablespoons cornstarch
- 1/4 teaspoon salt
- 1 teaspoon vanilla extract
- 4 ounces dark chocolate, chopped
- Whipped cream for topping (optional)
Instructions
Combine Dry Ingredients
In a medium saucepan, whisk together the sugar, cocoa powder, cornstarch, and salt until well blended.
Heat Milk
Slowly pour in the milk while continuously whisking to avoid lumps. Place the saucepan over medium heat.
Thicken the Mixture
Continue to cook the mixture, stirring constantly until it begins to boil and thickens, for about 5 minutes.
Add Chocolate and Vanilla
Remove from heat and stir in the chopped dark chocolate and vanilla extract until smooth.
Cool and Serve
Pour the pudding into cups and let them cool to room temperature. Refrigerate for at least 2 hours before serving.
Garnish
Top each cup with a dollop of whipped cream and enjoy!
Pro Tips
- For an extra flavor twist, try adding a splash of espresso or a pinch of sea salt before pouring the mixture into cups.
Common Troubleshooting Tips
If you find your pudding has a grainy texture, this could be due to the cornstarch not dissolving fully. Make sure to whisk it thoroughly when combining with the milk and heat gently to encourage even cooking. If you still encounter graininess, passing the pudding through a fine-mesh sieve before serving can help create a velvety finish.
Another common issue is over-thickening, which can occur if the mixture is cooked too long after it begins to boil. Your pudding should reach a good thickening point around the 5-minute mark. If it gets too thick, you can whisk in a bit of extra milk once cooled to achieve the desired consistency.
Ingredient Variations
If you're looking to give the pudding a unique twist, consider infusing the milk with spices such as cinnamon or cardamom during the heating phase for an aromatic experience. Just strain the spices out before adding the chocolate for a subtly enhanced flavor without overpowering the chocolate base.
For a dairy-free option, substitute the whole milk with canned coconut milk or almond milk, and make sure the chocolate is dairy-free. This will still yield a creamy texture, but with a distinct twist that can complement the depth of the chocolate beautifully.
Questions About Recipes
→ Can I use a different type of chocolate?
Yes! You can use milk chocolate for a sweeter pudding, but dark chocolate gives a richer flavor.
→ How long will these pudding cups last in the fridge?
They can be stored in the fridge for up to 3 days, covered tightly.
→ Can I make this pudding dairy-free?
Absolutely! Substitute the whole milk with almond milk or coconut milk and make sure the chocolate is dairy-free.
→ What can I use as a topping instead of whipped cream?
You can use coconut whipped cream, chocolate shavings, or even fresh berries for a fruity touch.
Creamy Chocolate Pudding Cups
What You'll Need
Ingredients
- 2 cups whole milk
- 1/2 cup granulated sugar
- 1/3 cup unsweetened cocoa powder
- 3 tablespoons cornstarch
- 1/4 teaspoon salt
- 1 teaspoon vanilla extract
- 4 ounces dark chocolate, chopped
- Whipped cream for topping (optional)
How-To Steps
In a medium saucepan, whisk together the sugar, cocoa powder, cornstarch, and salt until well blended.
Slowly pour in the milk while continuously whisking to avoid lumps. Place the saucepan over medium heat.
Continue to cook the mixture, stirring constantly until it begins to boil and thickens, for about 5 minutes.
Remove from heat and stir in the chopped dark chocolate and vanilla extract until smooth.
Pour the pudding into cups and let them cool to room temperature. Refrigerate for at least 2 hours before serving.
Top each cup with a dollop of whipped cream and enjoy!
Extra Tips
- For an extra flavor twist, try adding a splash of espresso or a pinch of sea salt before pouring the mixture into cups.
Nutritional Breakdown (Per Serving)
- Calories: 320 kcal
- Total Fat: 18g
- Saturated Fat: 10g
- Cholesterol: 30mg
- Sodium: 70mg
- Total Carbohydrates: 36g
- Dietary Fiber: 3g
- Sugars: 24g
- Protein: 5g